TL;DR
Hi, this is Debugger ready to debug JavaScript.
In this blog we will discuss the extra security layer implemented inside the application - encryption mechanism. It will be a series of how to break the client side encryption, add payload to the actual parameter and perform the application security testing. For this series, we will use DevTools as our main Tool.
Series breakdown in parts:
Part 1: Breaking the encryption of web application and bypass OTP.
Part 2: Some cool magic tricks which helps in finding the encryption logic easily.
Part 3: Understanding the Logic of encryption and fuzz the parameters.
There is a lot more, stay tuned!
TL;DR Quote
Debugger is always your BestFriend.
Introduction
Now a days, every financial sector applications i.e. mobile or web, use one or more encryption security layer(s) so that if an attacker, who is able to intercept the traffic through any MITM tools, can’t understand the request data. When we do pen-testing we follow certain methodology, we have to test each and every parameter and request. As we all know, attackers don’t follow any rules and regulations. When they want to attack they will find a way to do it. Keeping in mind the mindset of an attacker, we will try to understand- what developers are actually trying to accomplish when implementing encryption? Also, what kind of mistakes they make? Why implementing encryption means to them that the application will be secure? What makes them think that none can break their logic? So they hide sensitive information behind the encryption. Keeping the aforementioned questions in check with few more cases, I have prepared my own ““Debugging methodology”” which I follow when I am faced with such scenarios.
What is JavaScript?
JavaScript is one of the most popular and widely used programming languages in the world right now, still growing everyday, big companies like Netflix, PayPal build an entire application around JavaScript.
JavaScript is everywhere.
For the developers, it is used to build stuff but for an attacker JavaScript is used for breaking stuff.
For more, please visit: JavaScript.info
What can you do with JavaScript?
As I mentioned earlier, JavaScript is everywhere.
Previously JavaScript was only used in browser to build interactive web application, later with the support of huge communities and companies i.e. Google and Facebook you can now build complete -
- Web/Mobile applications.
- Real-time networking apps (chats, video streaming).
- Command line tools.
- Games.
- Desktop Applications.
- Windows95.
JavaScript vs ECMAScript?
Javascript is a language and ECMAScript is a scripting-language specification standardized by ECMA International.
Where does JavaScript code run?
JavaScript engines (V8 for Chrome, spider monkey for Firefox etc.)
Earlier one could only run JavaScript inside browser, but later on Node was developed (which is a Javascript engine outside browser).
Debugging with DevTools:
We will not go into the basics of DevTools. However to understand the DevTools, you can go through this: Blog
Let’s get into the main topic:
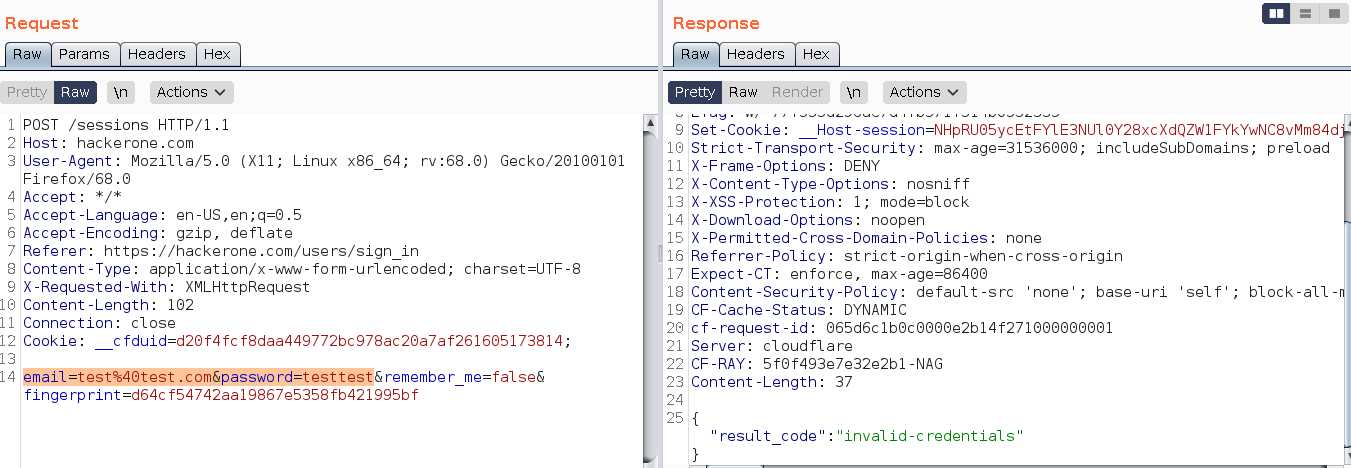
How does a normal request and response structure looks like without encryption?
Below is the normal request and response structure which shows that normally the parameters are in clear text when the encryption isn’t implemented.
How does a normal request and response structure looks like with encryption?
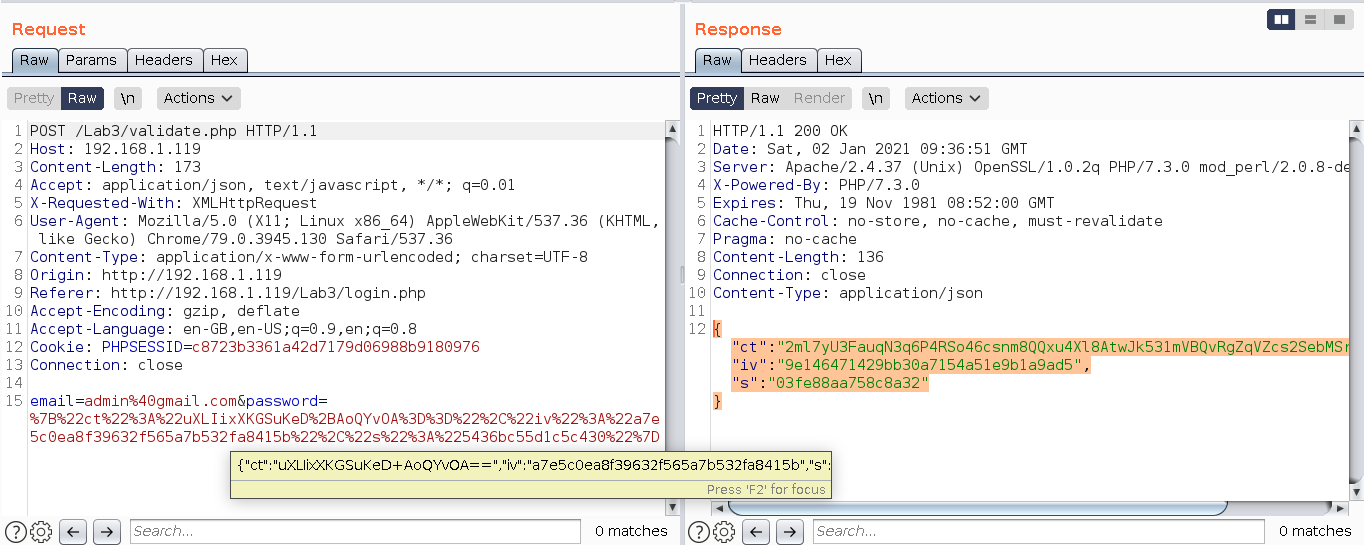
In the screen shot above, you can see the password parameter is encrypted and so is the response.
So to test the password parameter with our payloads, we will be required to break the encryption including the response’s too.
What developers think?
Developers usually use encryption to hide sensitive information from the user. They assume that with encryption implemented will preserve the confidentiality and integrity of the data, before someone breaks it!
Sometimes they may use multiple encryption techniques on the same piece of data, which just adds to the more processing power and complexity. Adding more layers doesn’t ensure the safety of the data.
Breaking and Bypassing encryption:
-
What?:
There are many ways to implement encryption on data. Some of the common usage examples are:
-
Encrypting the parameters:
i.e. some parameters value will get encrypted.
-
Encrypting the whole body:
i.e. whole of the post data is encrypted, so no one can guess what are the parameters are being passed through this request. Observe in the screenshot below that the response body is completely encrypted.

-
-
How?:
There are lot of ways to break the encryption, but below are the steps which I personally follow to find the logic and break the encryption.
We will try to understand by a step-by-step example:
I have prepared one demo application which helps you to understand the process, you can get the latest docker version of it from: jsdebugginglab, once you are done with the setup (You can follow the Readme), continue for the next.
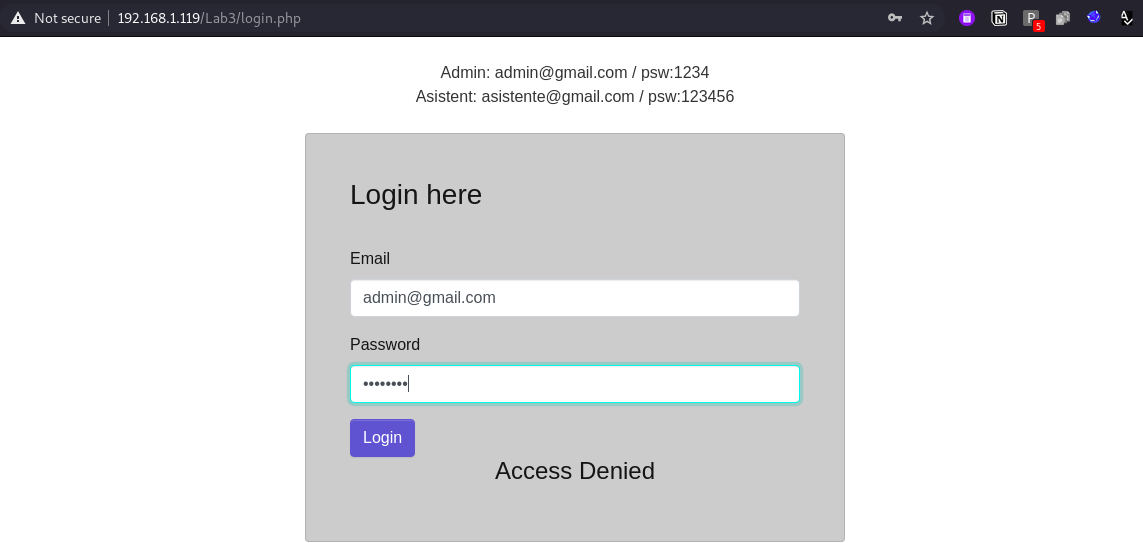
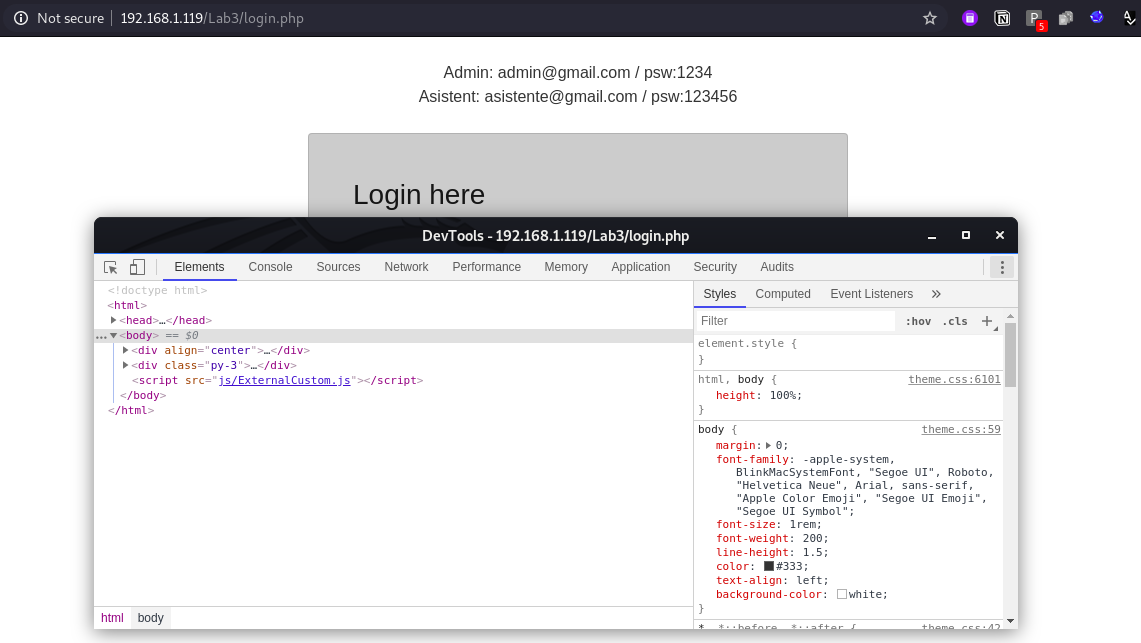
So we have one web application which asks for user email and password for authentication.
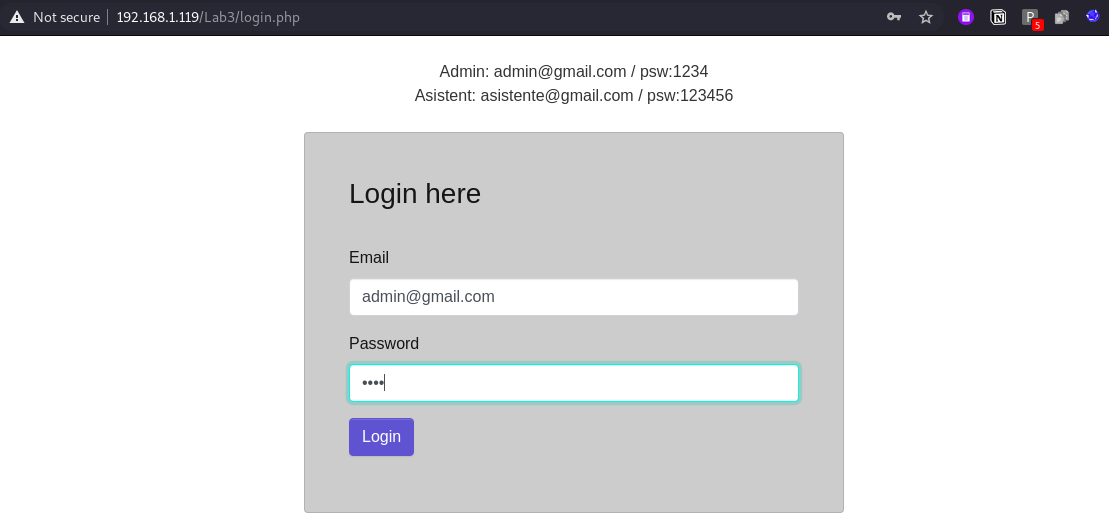
once we enter correct details it will send an OTP to registered mobile number and email address.
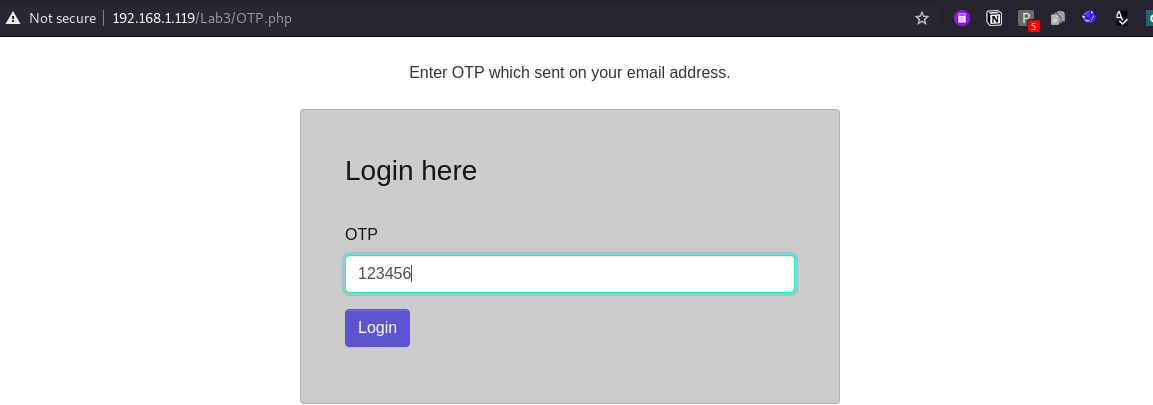
When you provide valid OTP you are successfully logged in, if not, you will get “Access Denied” message.
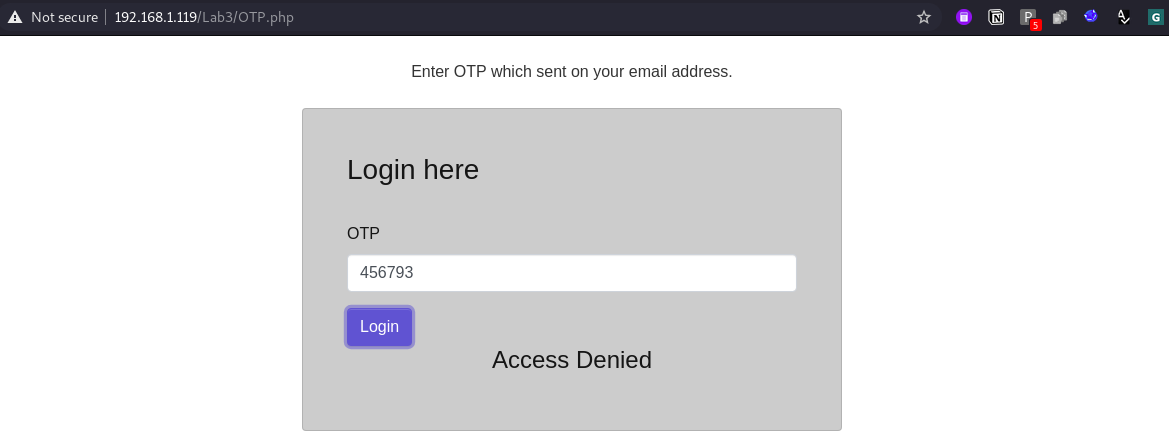
So, the aim is to bypass the authentication and OTP after breaking the encryption logic.
a.) Understanding the application and it’s flow.
Always first understand the flow of application by using valid credentials (if possible) also try to understand the encryption or the request where the encryption is implemented, so that you can understand how the encryption is getting generated.
Mainly focus on all the requests which are triggered when you click on the submit button or interact with the application.
Once you have identifed that move on with trying to break it. is it a parameter which is encrypted? or the whole request body? great you are good to go then.
For this step I am hoping you are already familier with burpsuite tool but it is not compulsory as we are just using burp to understand the request structure. You can also do it with DevTools Network option as well. Also, Here is a quick link which can help you to begin with burpsuite tool.
Let’s intercept the login request first and observe the request and response structure.

In the request Password parameter is encrypted and also the whole response is encrypted as well.
Lets intercept the next OTP request as our aim is to bypass the OTP.
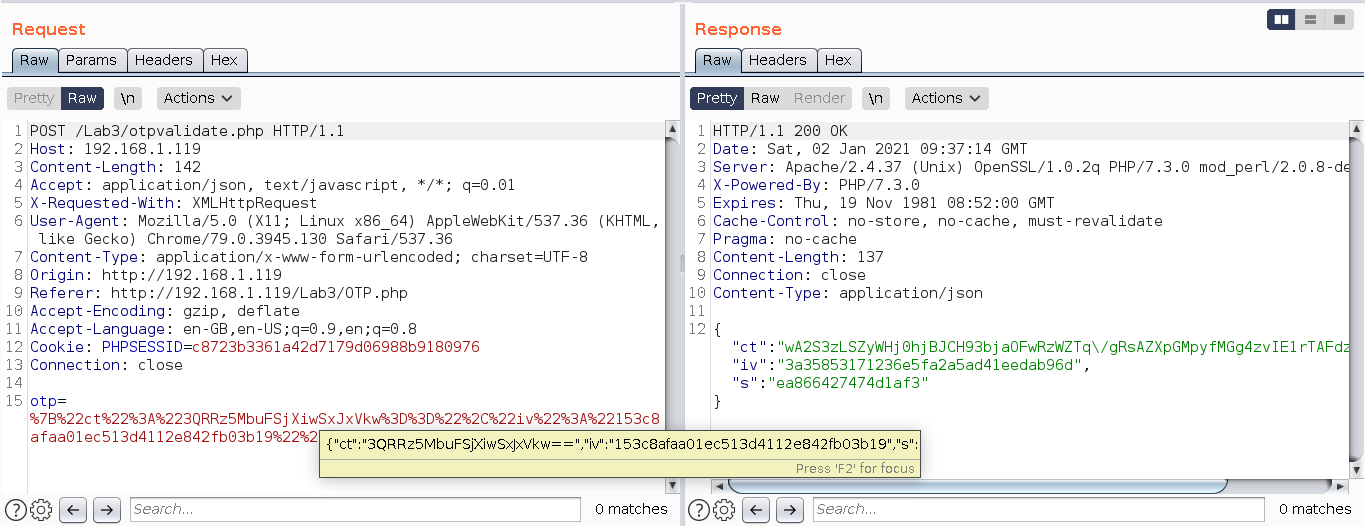
We can observe that our six digit otp 123456 is converted into an encrypted value using some logic and response from server is also something encrypted that we do not know but we can get the response in front end or in browser.
i.e. below is error response when we have entered wrong login credentials and also wrong OTP.
Next we have to observe all the requests which triggers when we click on Login button.
i.e. here we can see there are four main requests triggers when we click on Login and OTP:
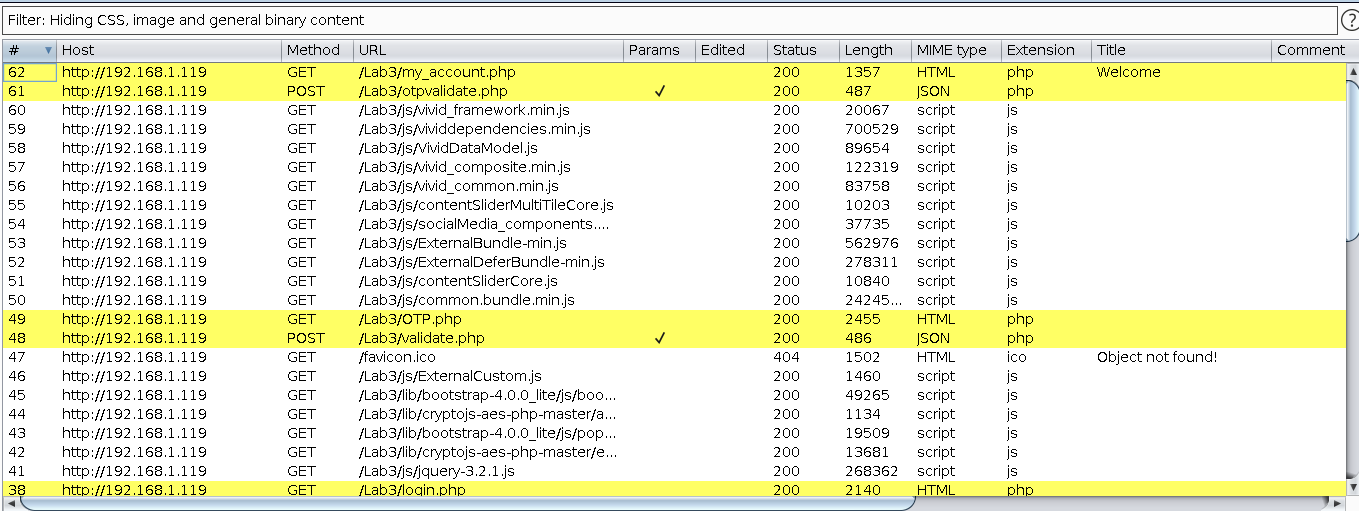
First login.php will invoke which redirect to Validate.php and that validate.php will contains our email and encrypted password as parameter and in response we will get encrypted data.
Post we will get OTP.php page where we need to fill up our OTP, and when we click on submit it will redirect to otpvalidate.php and that otpvalidate will contains our otp in encrypted format and in response we will get encrypted data.
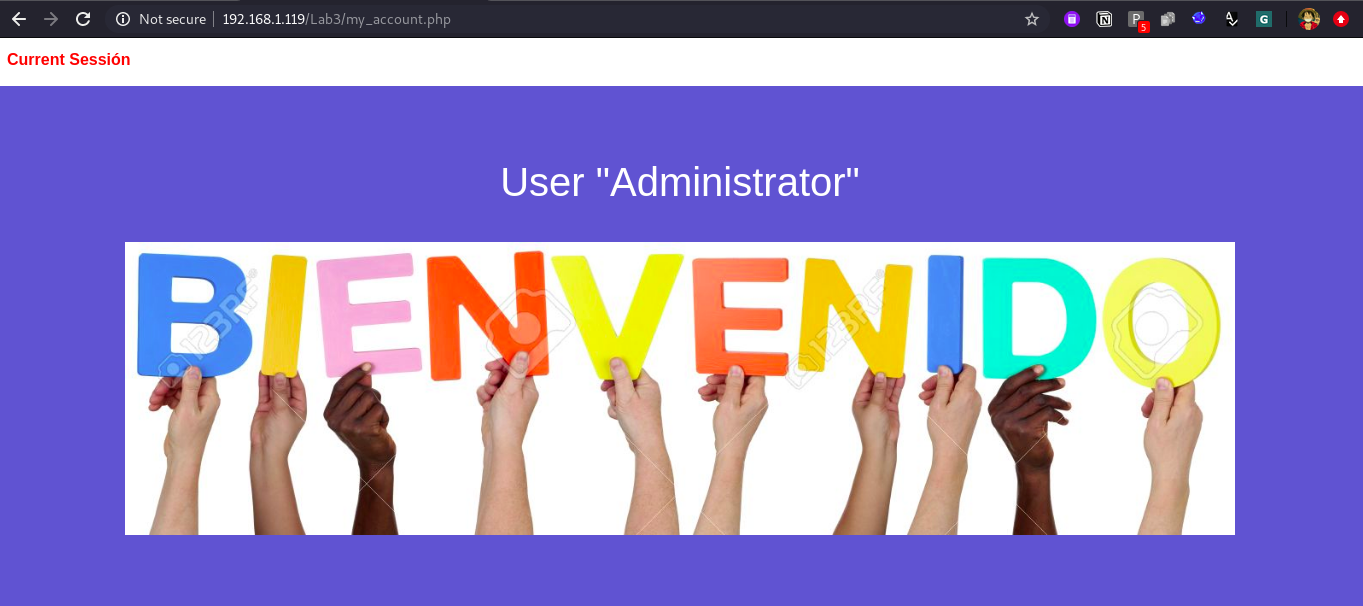
Post success we will get My_account.php which is dashboard of user who is logged in.
b.) When you found something, ask yourself is it on client side?
Now the guessing games begins :))
- As we have seen the response is in encrypted format but in browser we will get some response in clear text i.e. when the data is invalid we are getting “access denied”, so lets assume that the “access denied” is there in the encrypted response hence somewhere in the client side it’s got decrypted and we got the string value as an output. This will be our first guess that decryption logic is present in the client side somewhere.
- Next we can start with the OTP parameter, just copy that parameter value and use burp search utility and search if kind of same encrypted value you will get in any of the response, this is just a case to test if server is sending encrypted value to client side first and in next request the same encrypted value is getting used or not. The same can be done by observing every request body and response body for encrypted data.
- Once the above test case fail we can guess that the encryption logic may somewhere on the client side.
- Next to confirm the encryption is on client side, lets look into the Javascript files.
c.) Look for all files.
From here onward I am going to use DevTools only no burp is required anymore:))
We are using chrome DevTools only as it provides the modification of values at run time so you can modify the value of parameters before it gets encrypted Also, the snippet feature of it is the best:))
First of all, we’ll have to open up the DevTools. There are multiple ways to do that:
- Click on F12 to open it up.
- Right click on mouse and navigate to inspect element.
- Open it up from Developer tools section from browser settings.
Here in this blog, we will only talk about:
- Element: Element section contains the DOM Tree of the page you are viewing. As you hover over elements in the DOM tree, they will automatically highlight on the page.
- Console: It is used to run the your JavaScript code.
- Sources: This is the most powerful and useful feature of DevTools. All the sources called or used by the application at that moment can be found here as a source tree of application.
We will talk about other tabs later in this series.
As we know the logic part will be written as a JavaScript, hence we can assume that the encryption logic is also somewhere in the JavaScript file. This is not the only case some time the JS code is used inside the same file using
To get the list of source in DevTools navigate to sources tab and observe all the files.

One way to indentify the logic is to read the all JS files and logic’s used inside the application and understand it. But this process is really take out lot of your time and also sometimes the code is obfuscated and also it is very lengthy as well. So one easy way to find the logic is using keyword based search, in source tab click Ctrl+Shift+f and you will get one search bar, this is a global search feature of Chrome DevTools, by which you can search the text in all the files listed there in source tab.
Some of the best keywords you can search for:
- encrypt
- crypt
- OTP (As the otp parameter is having encrypted value)
- password (As the password field is having encrypted value)
- RSA (Encryption type)
- AES (Encryption type)
- key
Once you search for the keyword you will get the result and when you click one of them you will be autometically redirected to that specific file and the line number.
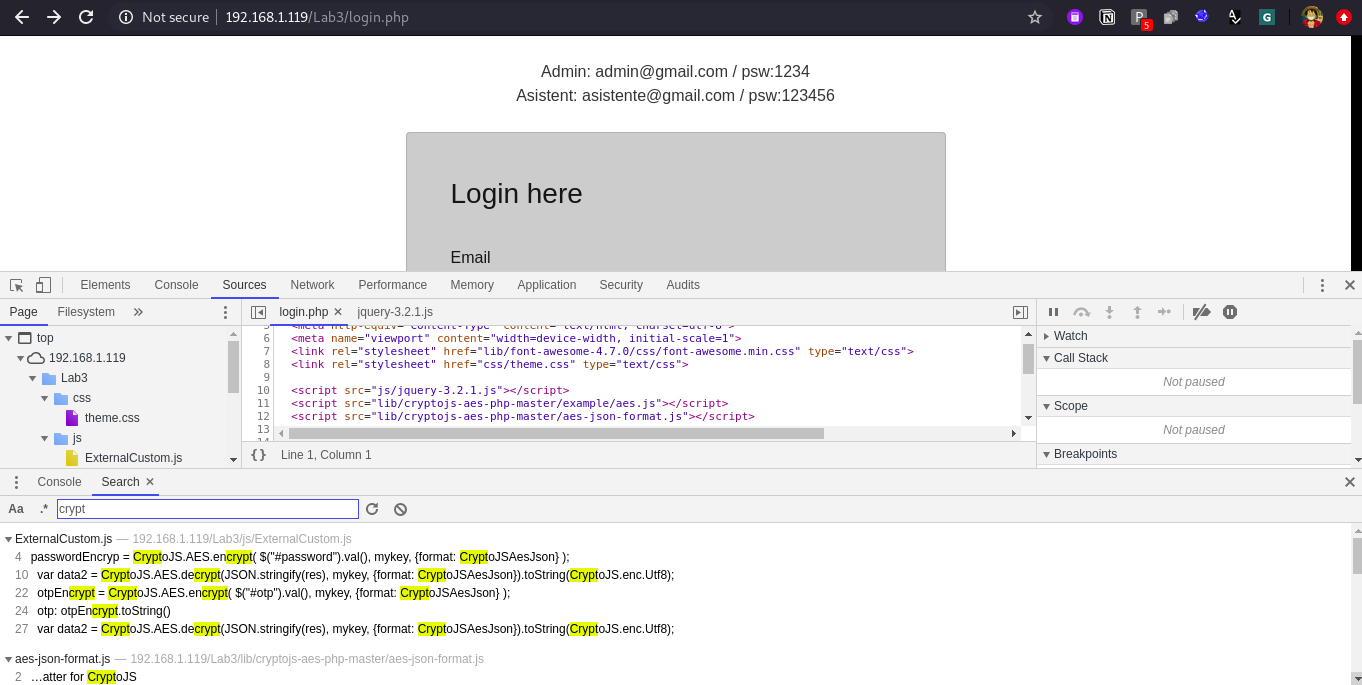
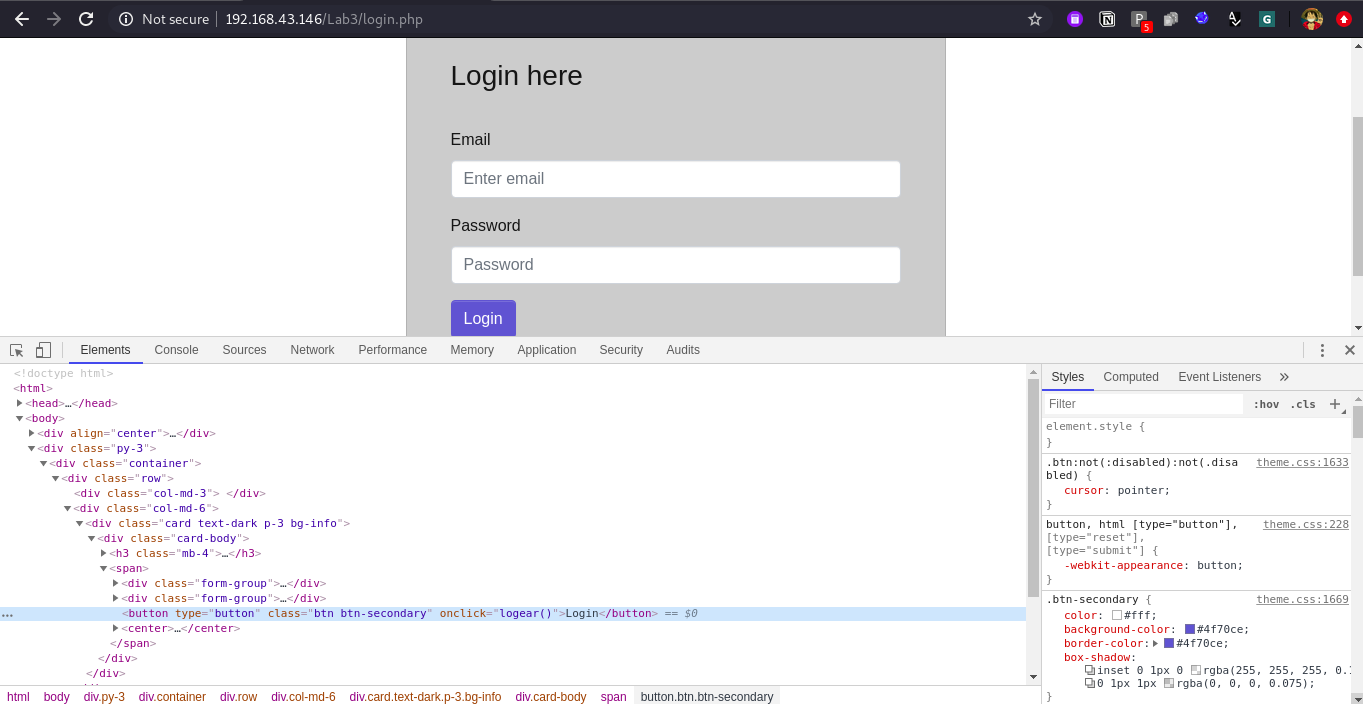
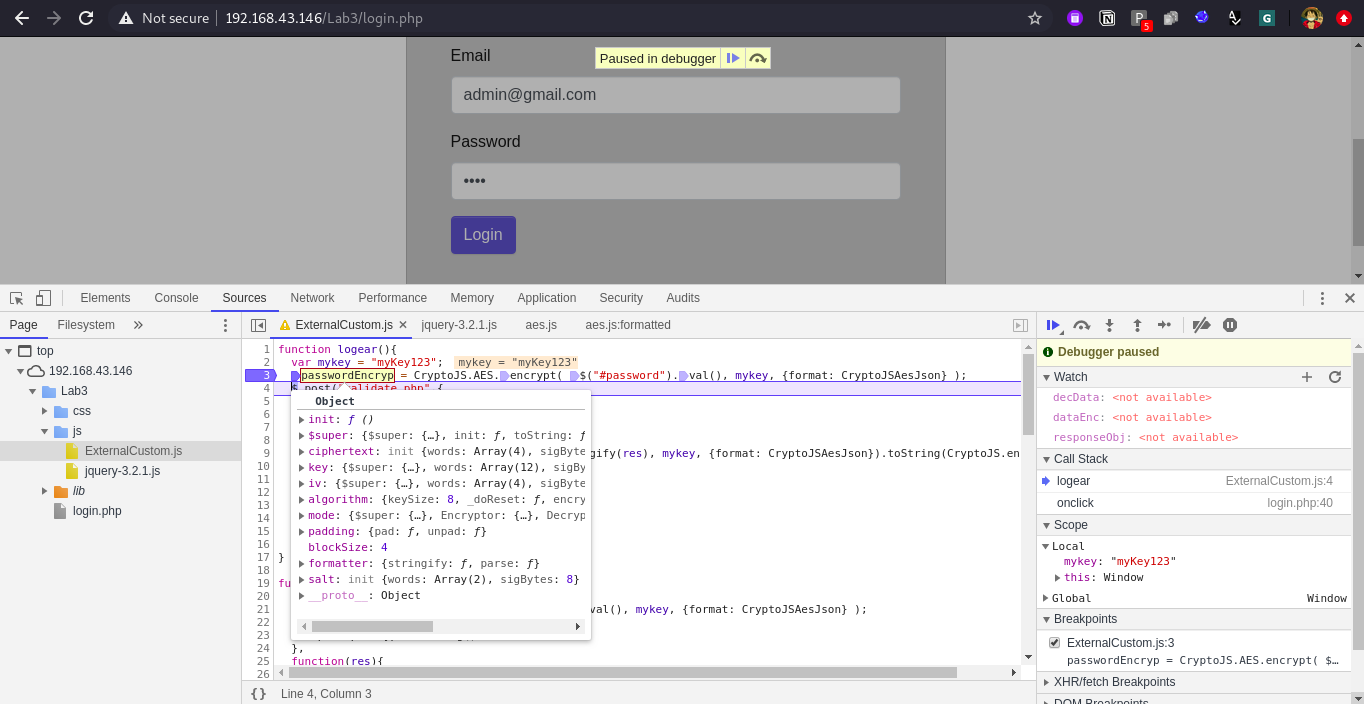
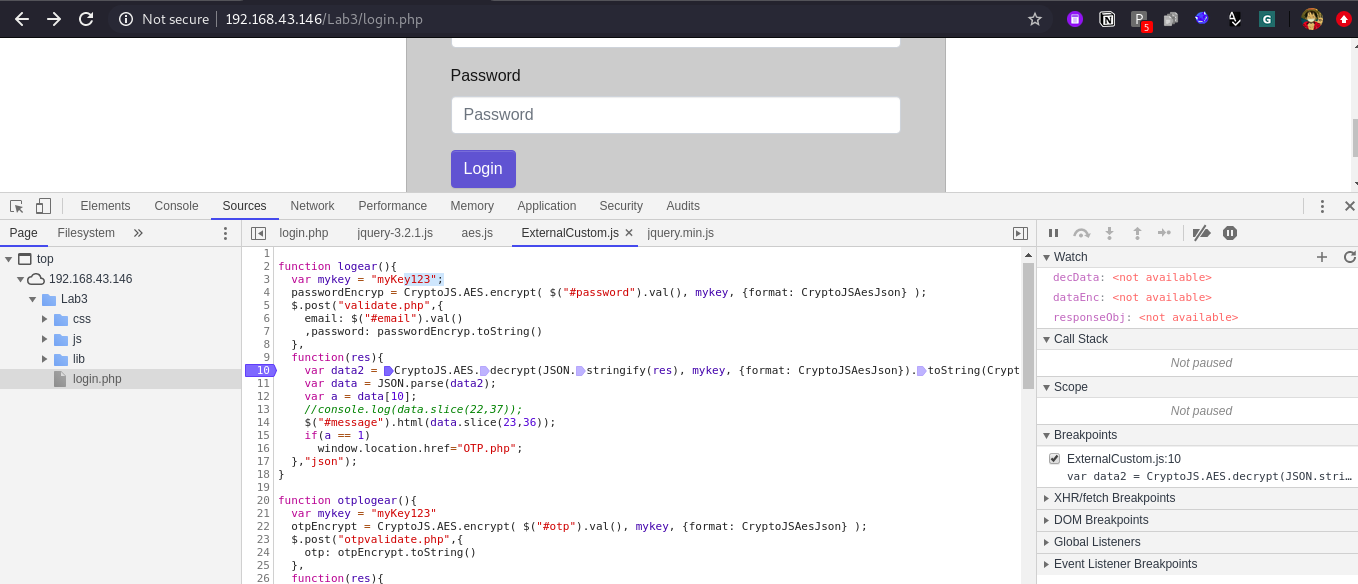
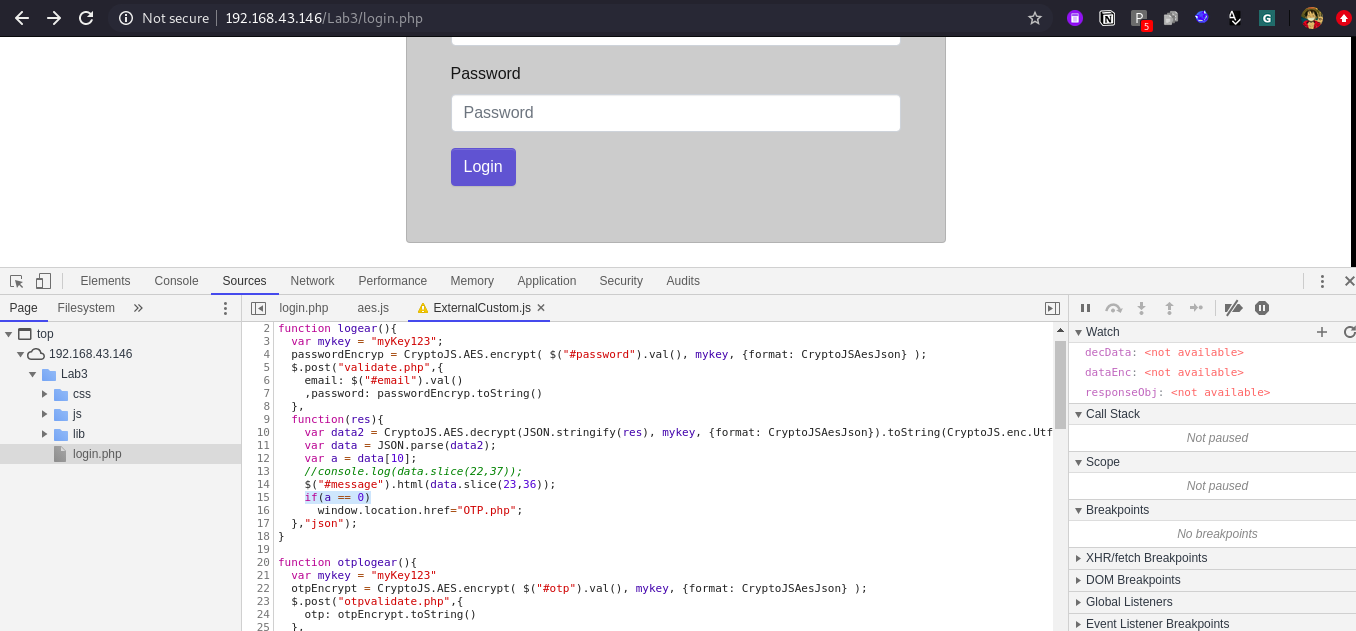
Observe the below screen shot we found one method logear() which contains key and perfom encryption of password.
There is also one another way using inspect element feature, navigate to the element tab in DevTools and navigate to login button in DOM tree and observe the tag and it’s attribute, some time the attributes help you get the action method. Like in below screen shot: we have one attribute onClick which contains value logear() and this logear() is method, which is responsible for encryption.
d.) Want to break encryption? Or Bypass something? Find the logic.
Lets start with our debugging process:
Now we have to confirm that the method we found is really used for encryption? it is just a dummy code or used for some other encryption method in the application?
One main point which we can observe from logear() is that the encryption is AES encryption and the key is hardcoded. Hence the same key is going to be used for decryption purpose as well.
There are multiple types of debugging method available in DevTools and really all of them are useful. but for this blog we will look into the most common and most used debugging process of DevTools.
Lets put our debug point in the source tab inside the logear() method, Now one question arises is where to put the debug point??? well answer is read the code and try to understand from where you can get the most information, like our aim is to break the encryption right? means get the original data before it gets encrypted. hence find your way by putting debug points one by one, this is complete try and error method to find the right place.
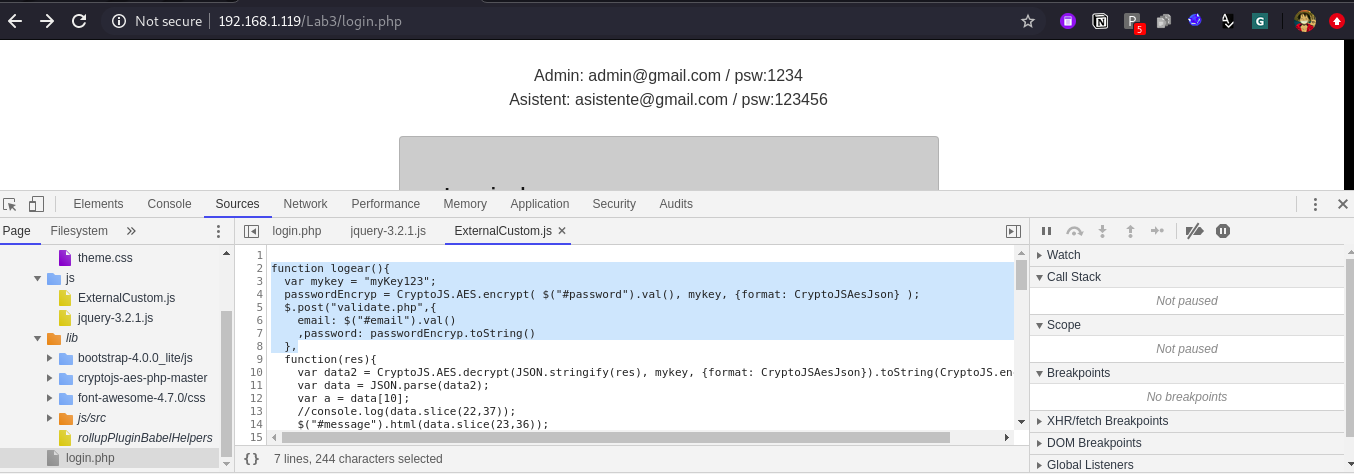
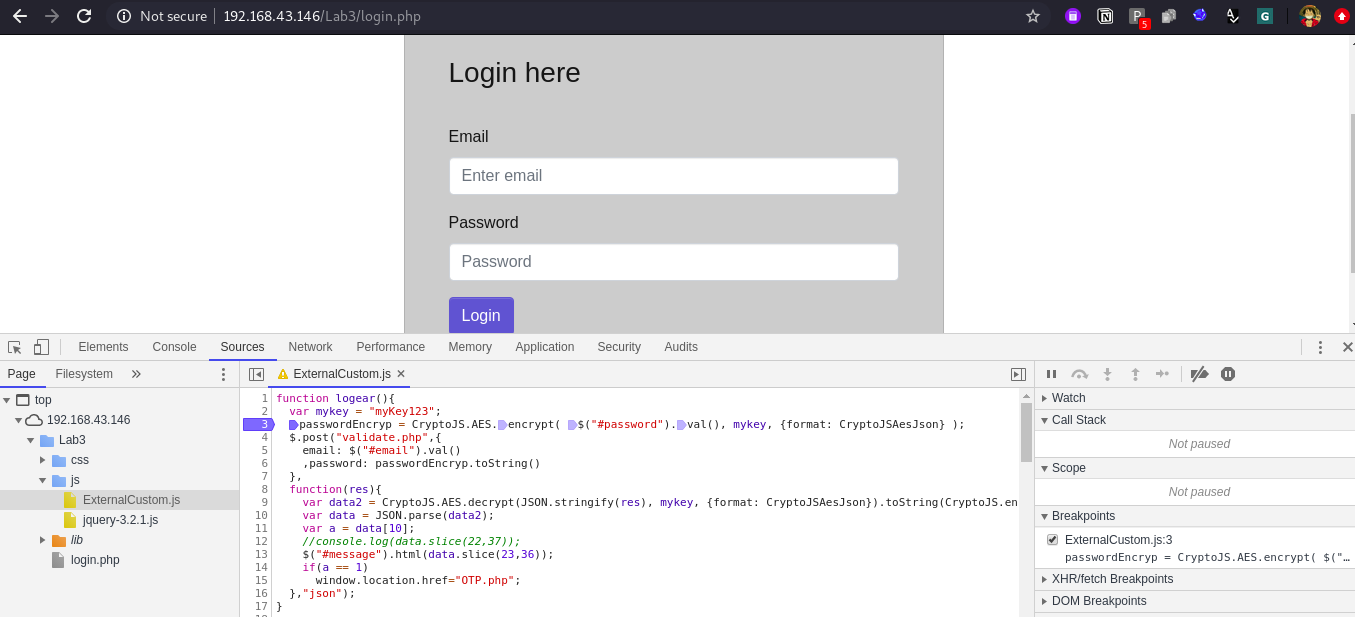
So here is the snippet of logear() method:
1.  function logear(){
2.    var mykey = "myKey123";
3.    passwordEncryp = CryptoJS.AES.encrypt( $("#password").val(), mykey, {format: CryptoJSAesJson} );
4.    $.post("validate.php",{
5.    email: $("#email").val()
6.    ,password: passwordEncryp.toString()
7.   },
8.   function(res){
9.    var data2 = CryptoJS.AES.decrypt(JSON.stringify(res), mykey, {format: CryptoJSAesJson}).toString(CryptoJS.enc.Utf8);
10.   var data = JSON.parse(data2);
11.   var a = data[10];
12.   //console.log(data.slice(22,37));
13.   $("#message").html(data.slice(23,36));
14.   if(a == 1)
15.     window.location.href="OTP.php";
16.   },"json");
17. }
Now if we try to understand it.
Line No. 2: Hardcoded key stored inside mykey variable.
Line No. 3: CrytoJS.AES.encrypt method is called which is having 3 arguments data, key, format.
Line No. 4 to 6: Request is created and using post method it is send to validate.php in body part.
Line No. 8: Function to handle the response. (as we know response is also encrypted).
Line No. 9: CryptoJS.AES>decrypt method is called which is having 3 arguments response_data, key, format.
Line No. 11 to 13: Some kind of process of slicing the data or clear text response.
Line No. 14 to 16: Conditional validation where if a == 1 only than it will change the window location to OTP.php.
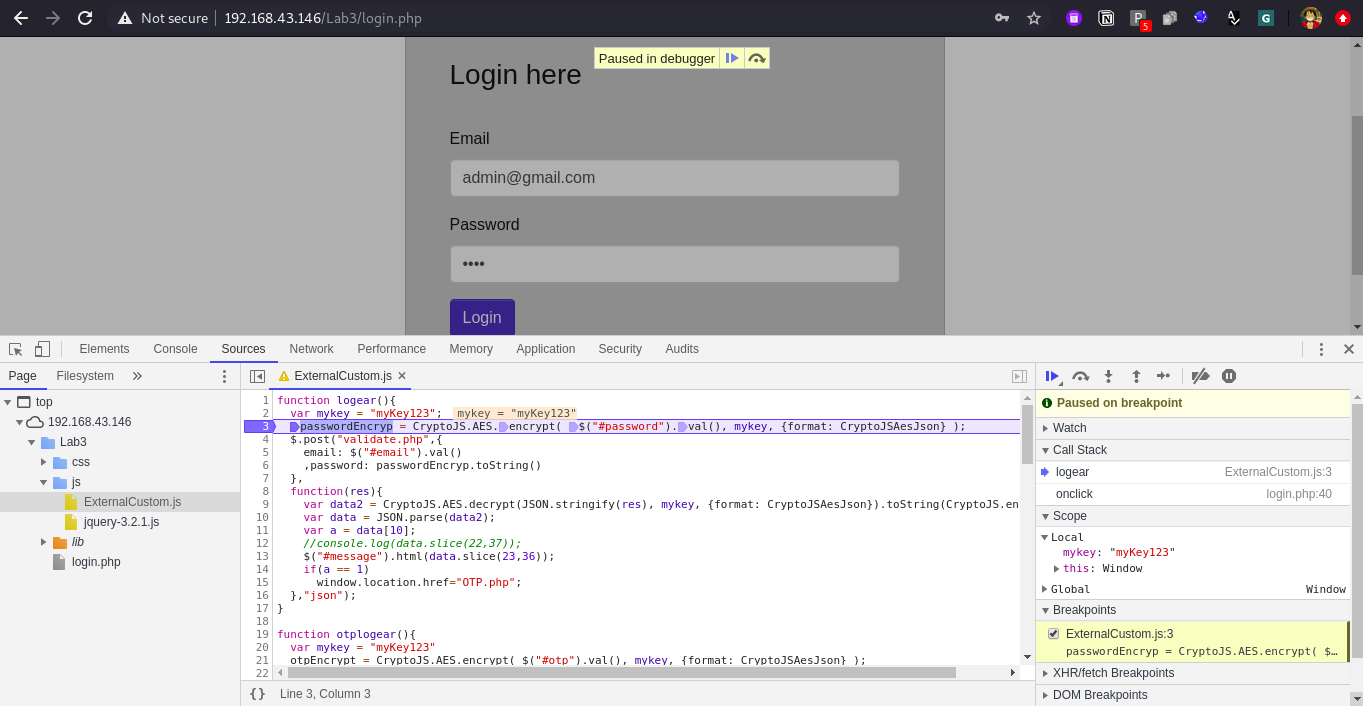
Once we understood the logic we can put our debug point at Line No. 3 as it contains the encryption method.
Once you have added your debug point, submit the data in the application and click on login button, the process will autometically stopped at Line No. 3 inside the logear() method. Currently we will add valid credentials to observe the real request and response of the application, later on we will bypass both login and otp page.
Now on the right side of source we can observe lot of sub tabs are there, lets understand them:
-
Top debugging menus: This is to handle or start stop our debug pause, also to step inside the method or steup out.
a.) The first play like button is bascially for resume the script excution.
b.) The second button is for step over to the next function call from this current fuction where you are into right now.
c.) The third button is we are going to use most which help you step inside the fuction to get some variable value or argument value.
d.) The fourth button is for stepping out from the current function you are in.
e.) The fifth button is to go step by step (one step at a time).
f.) The sixth and seven buttons are for deactivating the breakpoints and pause whenever any exception occurs. -
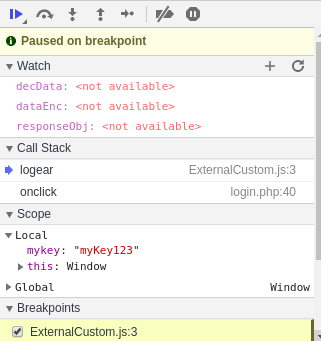
Watch: This is really useful mainly if the variables are created locally and not setup gobally. Means to get the current value of variable you have to run the application right. so the watch will help you to keep track of variable value whenever it gets changed.
-
Call Stack: Just to navigate where you are in the code and in which file.
-
Scope: This is most useful section for us. This is the place where we get the current value of all the variables, we can even modify them at run time here. So we will get our original data here in the scope and we can modify it.
Now if you have observed in above screen shot that in scope section we got key value as mykey : “mykey123”
When we click on third button which is “step in” we can observe it is taking us to fetch the password value #password. As we do not care about how the password will fetch we can directly click on fourth button which is “step out”, when we click on “step in” again, it will take us to fetch different value which we do not care again hence click on “step out” once more. Now observe we are at third place call encrypt (from CryptoJS.AES.encrypt) this mean now this CryptoJS is going to be used hence when we click on “step in” now we will move inside aes.js file.
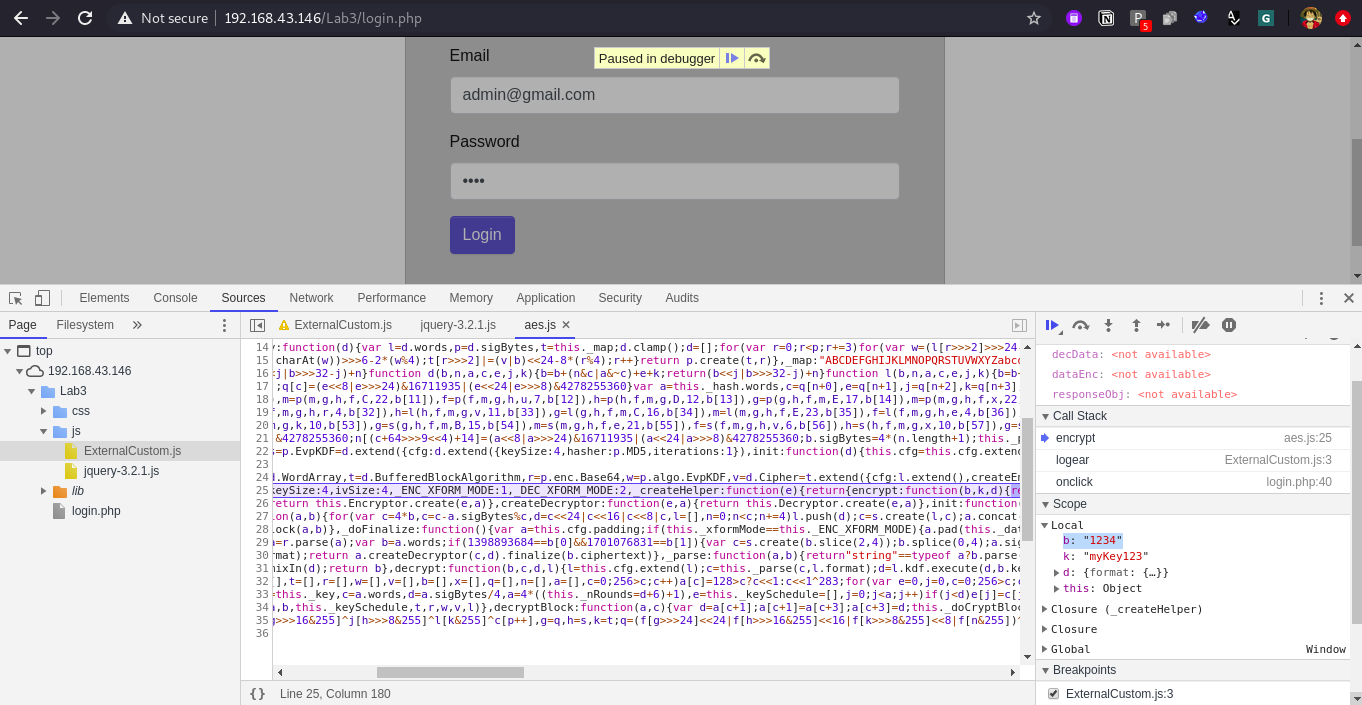
Now from here we can observe multiple things.
- We got our original text as a variable b = 1234 in scope section.
- We got the real file which is responsible for this encryption “the encryption algo.” is inside aes.js
- In call stack observe the encrypt is called hence now the encryption is going to happen.
- aes.js is hard to read, so to make it pretty we are going to use one more feature of DevTools is “{}” -> this button will make the JS pretty for you.
Click on below {} button at the bottom and observe the aes.js is formatted now in readable format. Also, we can observe we are at one encrypt: function(b,k,d) method, DevTools also help you read the run time value of those arguments i.e. b = “1234”, k = “mykey123” etc.
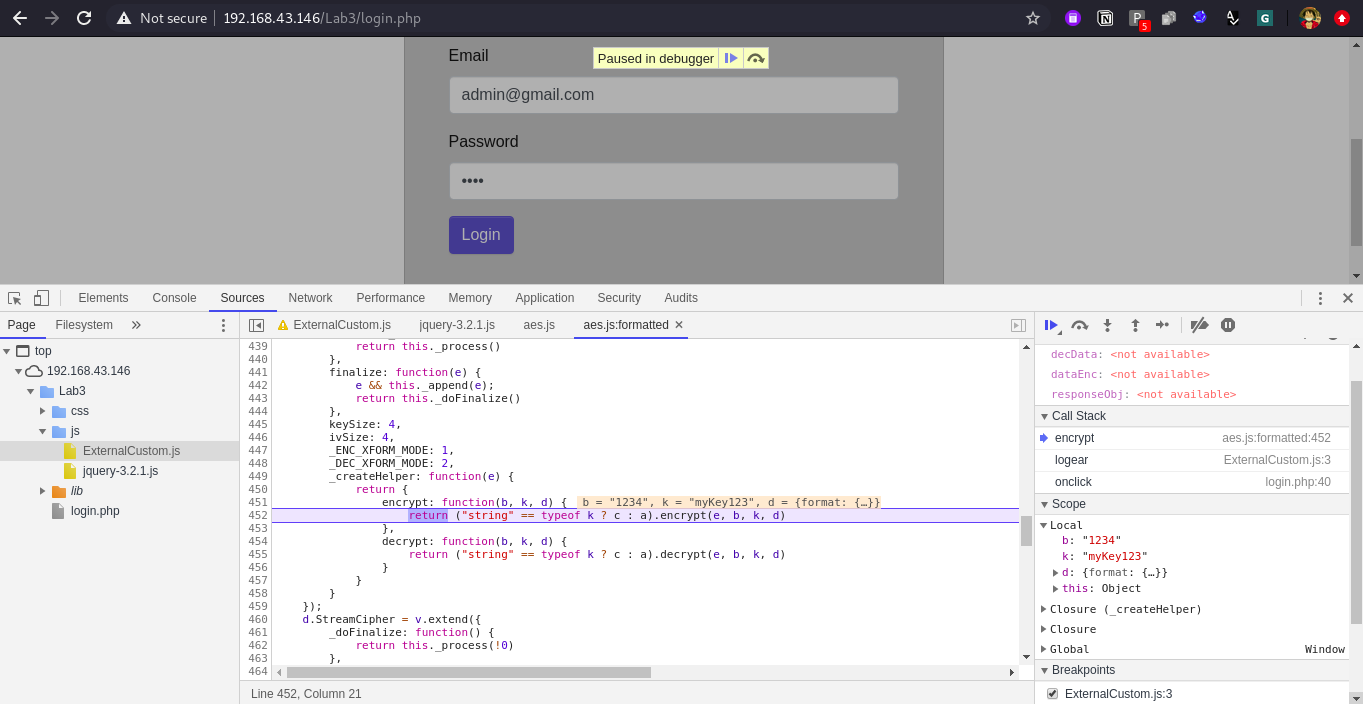
Now click on “step out” button one time. and observe that the code execution is now moved to next line, Line No. 4.
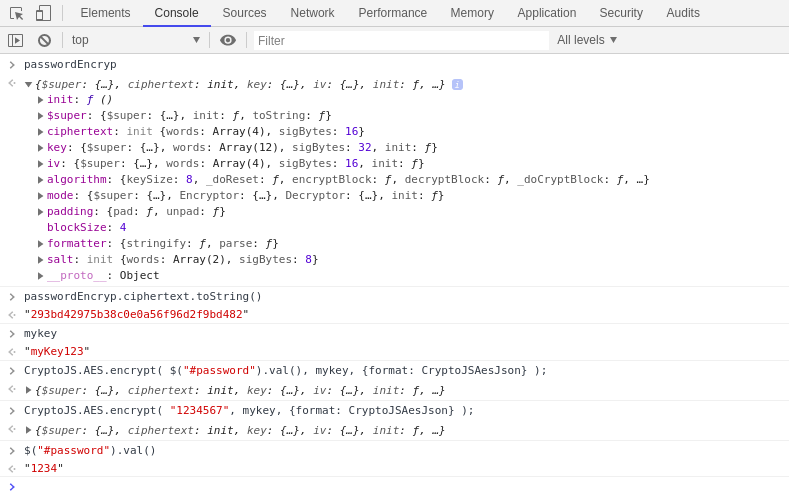
Now click on console tab and you can details of variable in console also by calling out those methods or variables.
Same way lets observe the encrypted response also and observe its original value.
For this put your debug point at Line No. 10 in logear() method.
Submit your data in the application and click on login and observe in scope we got encrypted data in res variable.
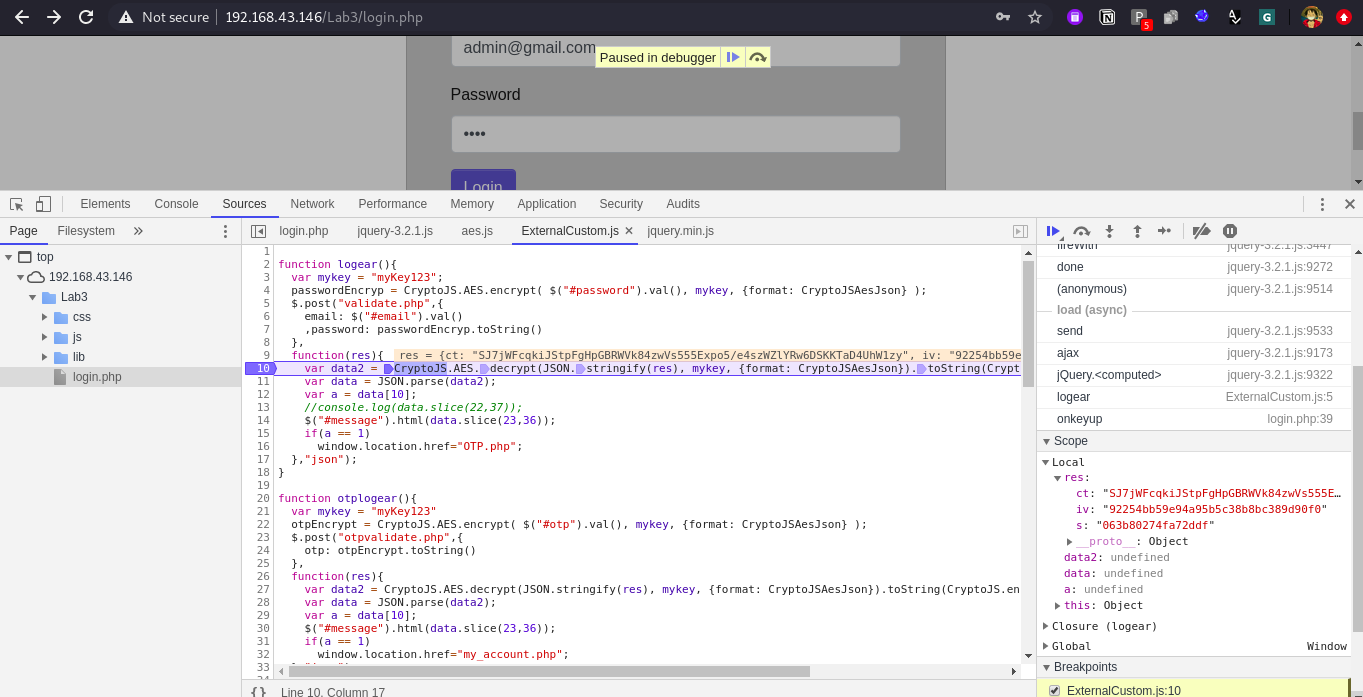
Now type Step in -> Step out -> Step in -> Step out and observe we got decrypted value in variable data2.
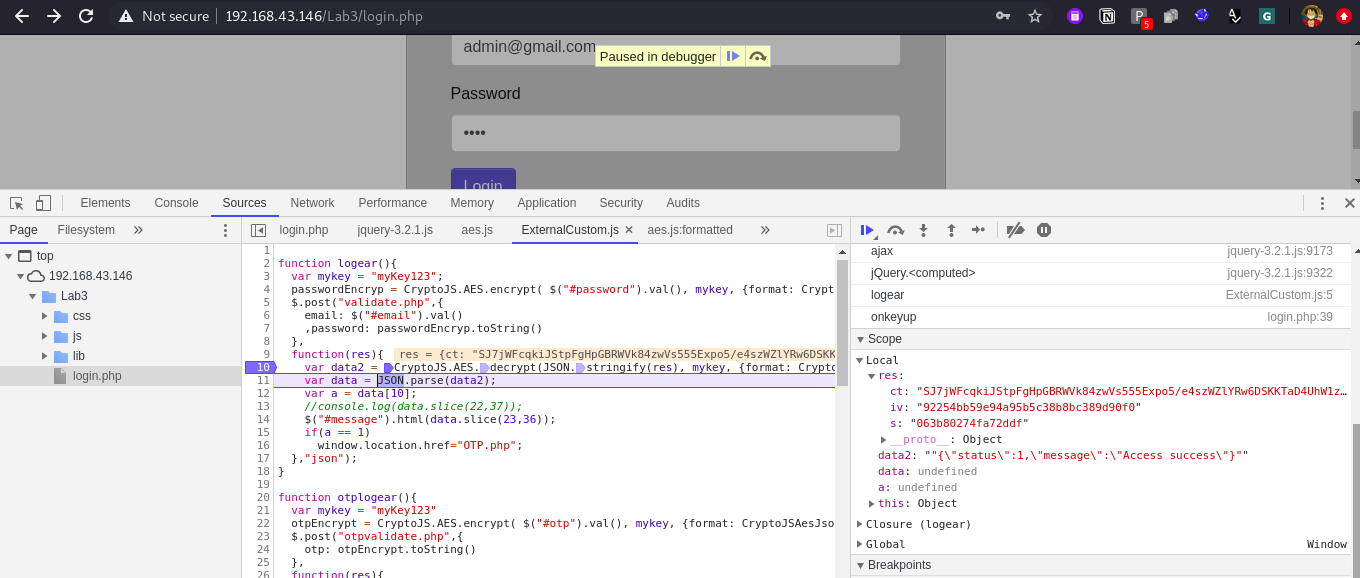
The decrypted response of valid credentials is “”{"status":1,"message":"Access success"}””. Now observe that Json data contains two key values, status and message.
status: We are not sure what is this for.
message: This message is also we can verify yet.
but lets just keep note of this success response from the application.
Now lets try the same process again but this time we will provide wrong credentials to application.
Email: admin@gmail.com (valid email address)
password: we will enter wrong password 456789
Adding debug point at Line no. 10, provided invalid credentials and click on login and observe the invalid response.
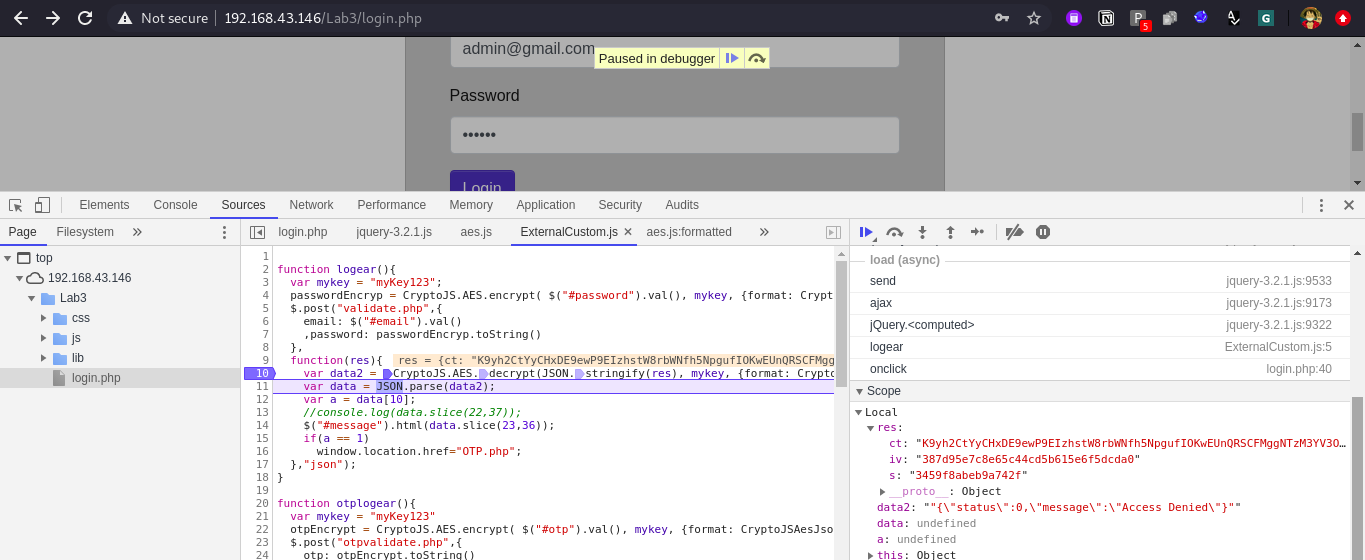
The decrypted response of invalid credentials is “”{"status":0,"message":"Access Denied"}””, now when we observe the response in browser we see that we got one message “Acess Denied”, and this is the same message which is written here in the json response. Hence we can confirm that what is the use of message parameter. Now for status parameter.
As we have already understood the whole process of logear() method earlier, and we saw there is something condition check is implemented where a == 1, so lets what is a is used for and how it is calculated?
- One way to get this is by adding the debug point at Line No. 12 and observe both valid and invalid responses of application.
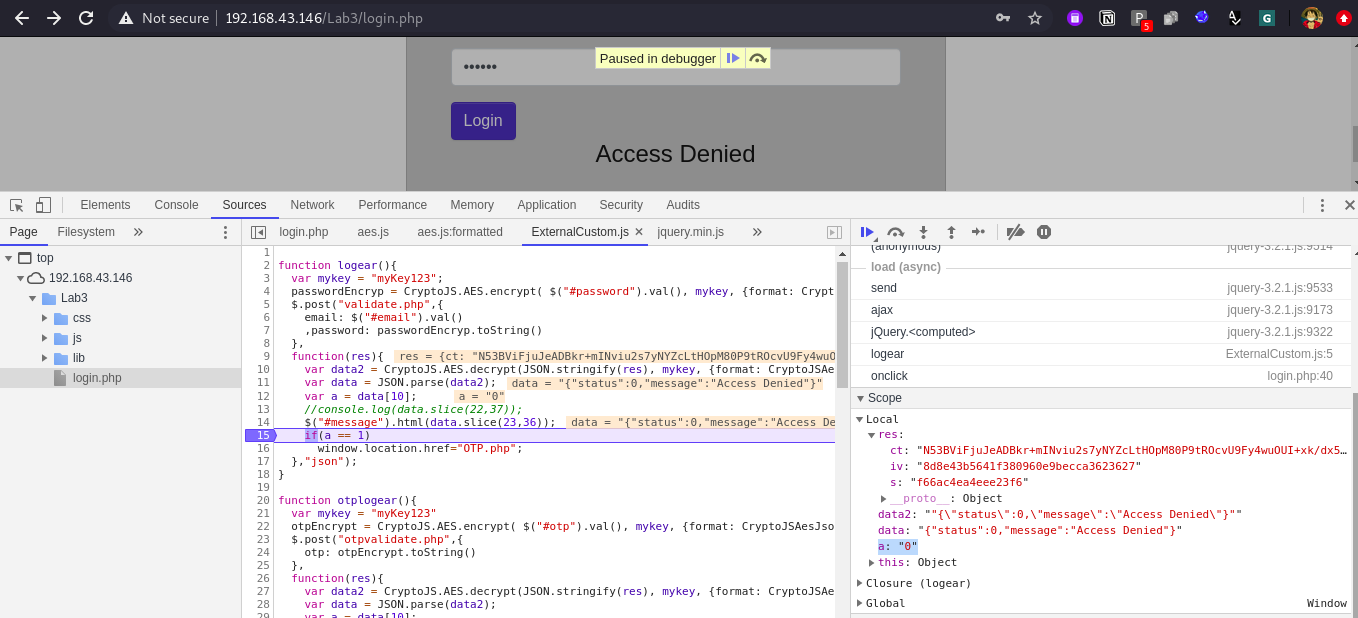
So we can confirm that status value is the value of a variable and which is compared with 1 and if it is true only that we will redirected to next page which is OTP.php
- Read the logic of logear() method from Line No. 10 to 16 and apply it on json response.
    10.   var data = JSON.parse(data2);   // data2 = ""{\"status\":0,\"message\":\"Access Denied\"}"" hence data = "{"status":0,"message":"Access Denied"}"
    11.   var a = data[10];    // a = 0
    12.   //console.log(data.slice(22,37));
    13.   $("#message").html(data.slice(23,36));
    14.   if(a == 1)                       // 0==1  => False and if a=1 and 1==1 ==> true
    15.     window.location.href="OTP.php";
    16.   },"json");
So to bypass the Authentication we have to modify the value of status or a from 0 to 1. or else we have to modify the condition check on client side i.e. from a==1 to a==0.
- Bypass using modifying the status value or a value to 1.
For this we can modify the value of a variable in the scope section of DevTools. Lets add our debug point at Line No. 15 and modify the value of a in scope section from 0 to 1.
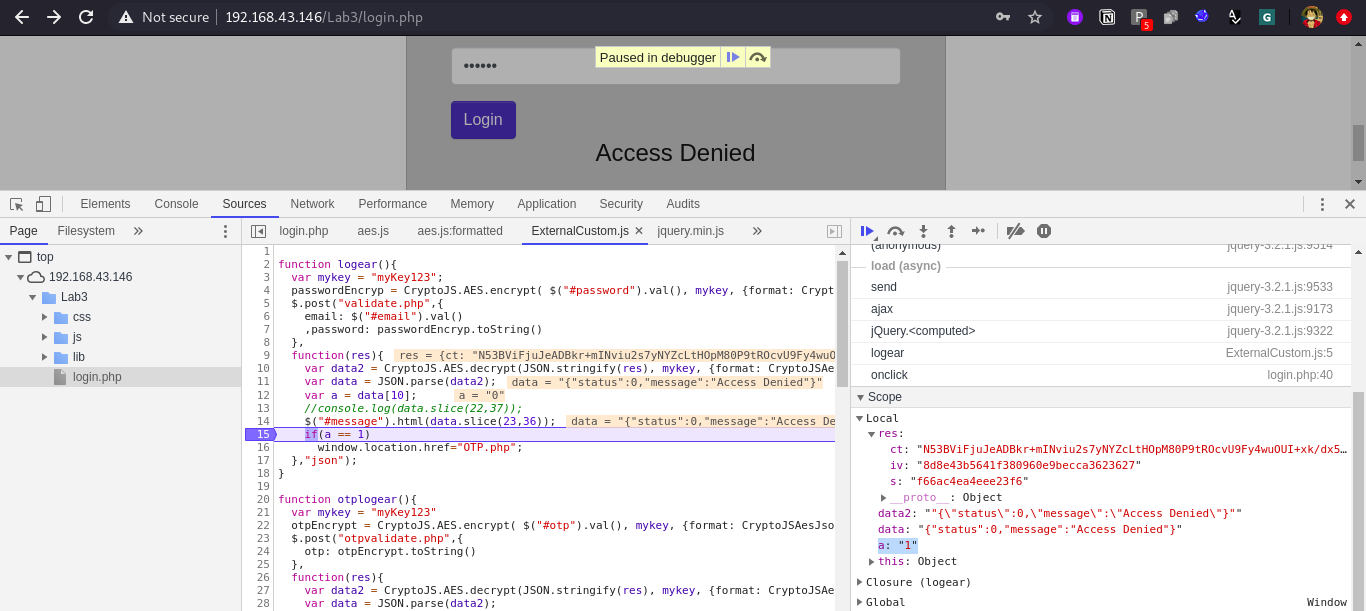
Observe in browser we are moved to next page OTP.php :))
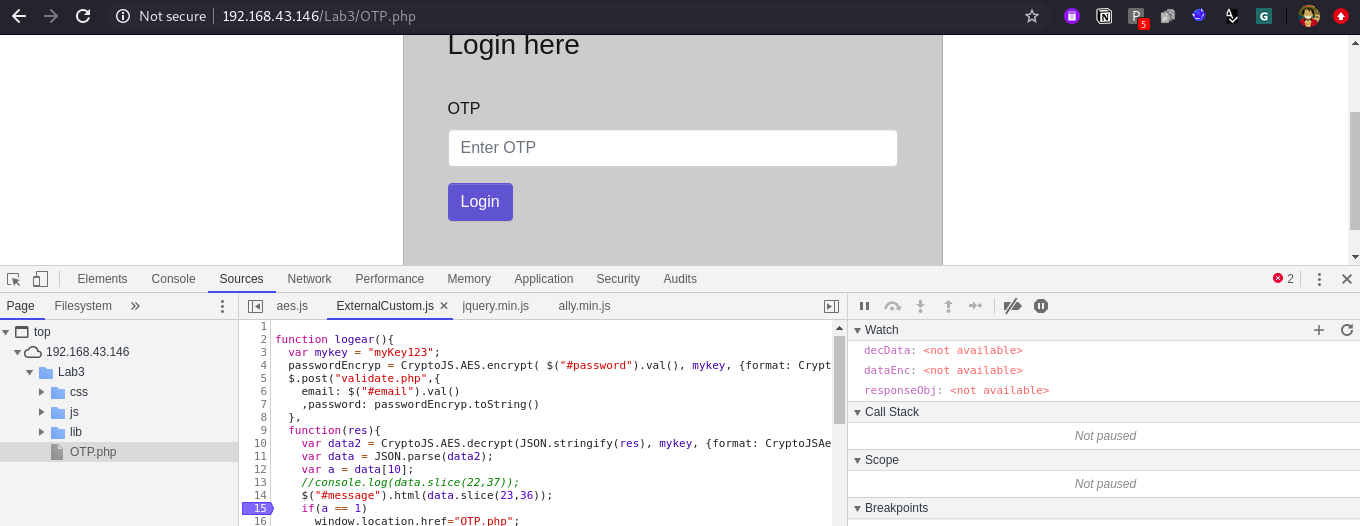
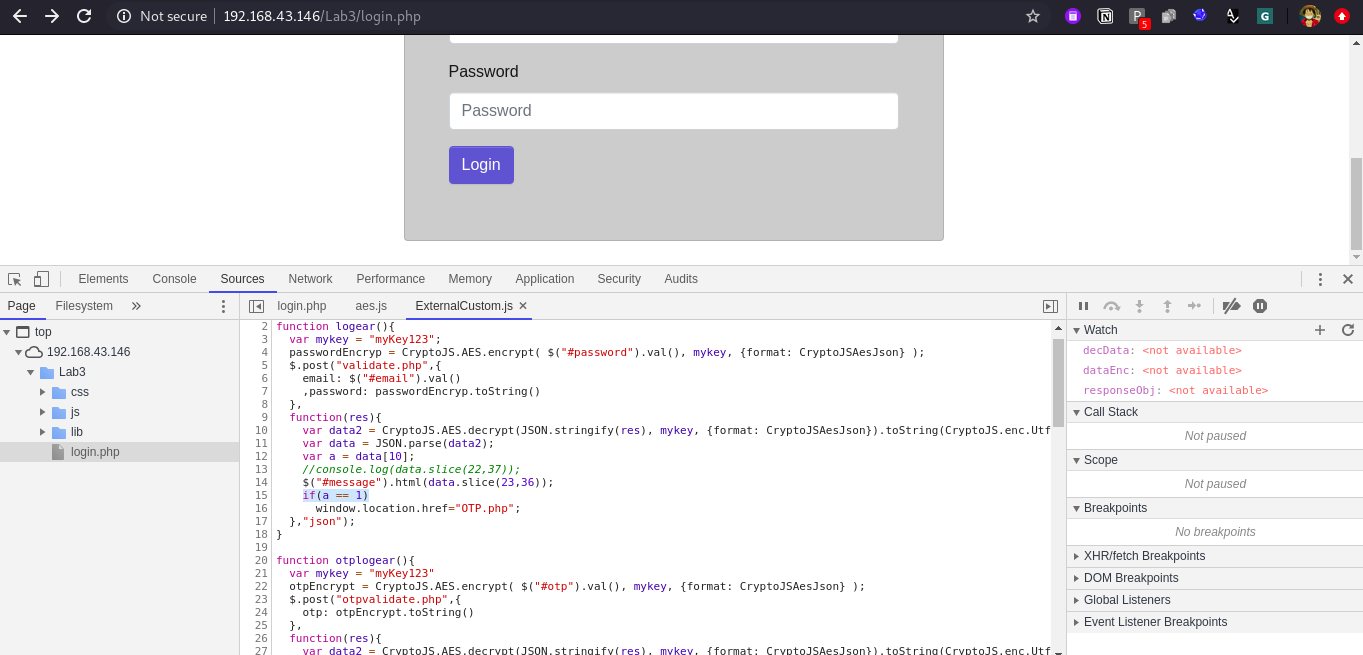
- By modifying the conditions on client side.
From source tab just modify the condtion from a==1 to a==0 and press ctrl+s to save it cool done. No need to put any debug point for the same. Enter invalid credentials to the application and click on login button and you will go forward to next page OTP.php
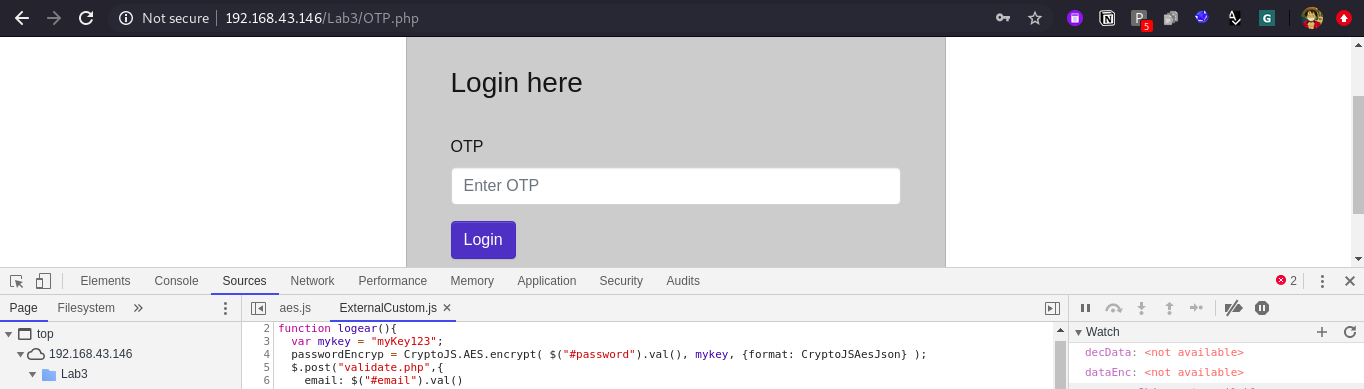
Now we are on the OTP.php screen, we can bypass the same as well with same process but the encryption method is different than before.
Take this OTP.php bypass as task and try it out on your own. The lab will be available on docker, you can configure it on your own and try it out.
Conclusion:
This blog was to help you with the basic idea and a kick-start of how to proceed when met with such scenario, bypassing the same to find all the possible bugs hidden. The real world of encryption is sure lot more complex than this one but a good kick-start is always needed to fly higher.:))
I enjoyed writing this article and hope that you enjoyed reading it.
In part 2, we will discuss more about DevTools and see some cool tricks which will help you to find the encryption logic. We will go through some more examples.
Thank you for your time and stay tuned for more!
You can find me here:
Twitter : @sameer_bhatt5
Github : bhattsameer
LinkedIn: bhatt-sameer
![]()
Reference:
https://blittle.github.io/chrome-dev-tools/
https://javascript.info
https://developers.google.com/web/tools/chrome-devtools
![]()